Orchids represent one of nature’s most exquisite flowering plants, captivating gardeners and plant enthusiasts worldwide with their stunning blooms and elegant forms. Despite their reputation for being finicky, caring for orchids can be surprisingly straightforward when you understand their basic needs. These magnificent plants, with over 25,000 species globally, have adapted to thrive in diverse environments, making them excellent indoor plants for those willing to learn proper orchid care techniques.
The key to successful orchid growing lies in mimicking their natural habitat conditions. Most popular houseplant orchids, particularly Phalaenopsis orchids (moth orchids), originate from tropical regions where they grow as epiphytes, clinging to trees and absorbing moisture and nutrients from the air. Understanding this natural behavior is crucial for providing appropriate care that encourages healthy growth and spectacular orchid blooms.
Many beginners assume orchid care requires extensive expertise, but this misconception prevents countless people from enjoying these remarkable plants. In reality, orchids need consistent, appropriate care rather than complex interventions. The most common mistakes include overwatering, inadequate lighting, and using an inappropriate potting mix. By avoiding these pitfalls and following proven orchid care tips, you can successfully grow thriving orchids that reward you with breathtaking flowers year after year.
Whether you’re a complete novice or looking to improve your existing orchid care routine, this comprehensive guide will provide you with essential knowledge to transform your orchid-growing experience. From selecting the right growing medium to mastering watering orchid techniques, we’ll explore every aspect of orchid plant care to ensure your plants not only survive but flourish with abundant, beautiful blooms.
Understanding Orchid Basics
What Makes Orchids Unique
Orchids belong to one of the largest flowering plant families, Orchidaceae, with incredible diversity in size, color, and growing habits. Unlike traditional houseplants, most orchids are epiphytes, meaning they naturally grow on other plants without parasitizing them. This unique characteristic significantly influences their care requirements, particularly regarding potting mix and watering schedules.
The specialized root system of orchids differs dramatically from conventional plants. These roots are designed to absorb moisture quickly from rain or humidity while requiring excellent drainage to prevent rot. Understanding this fundamental difference is essential for successful orchid care, as it explains why standard potting soil proves fatal for most orchid species.
Orchid flowers also exhibit remarkable complexity and longevity compared to typical blooms. A single orchid bloom can last several weeks or even months, making them exceptional value as flowering houseplants. However, achieving these long-lasting flowers requires proper orchid plant care techniques that support the plant’s natural blooming cycle.
Popular Orchid Varieties for Beginners
Phalaenopsis orchids, commonly known as moth orchids, rank as the most beginner-friendly variety due to their tolerance for typical home conditions. These orchids prefer bright indirect light and can adapt to moderate humidity levels, making them perfect starter plants for those new to orchid growing. Their elegant, cascading flower spikes create stunning displays that can last for months with proper care.
Cattleya orchids offer spectacular, fragrant blooms but require slightly more specific care conditions. These orchids need more direct sunlight than Phalaenopsis and prefer a distinct wet-dry cycle in their watering schedule. However, their magnificent flowers and intoxicating fragrance make them worthwhile additions to any orchid collection.
Dendrobium orchids present another excellent option for intermediate growers, offering diverse flower forms and colors. These orchids typically require a winter rest period with reduced watering to trigger blooming, teaching growers important lessons about seasonal orchid care adjustments.

Essential Orchid Care Requirements

Light Requirements for Healthy Growth
Proper lighting forms the foundation of successful orchid care, as inadequate light represents the primary reason orchids fail to bloom. Most orchids thrive in bright indirect light, receiving sufficient illumination without exposure to harsh direct sunlight that can burn their delicate leaves. A simple shadow test can help determine if your lighting is appropriate: hold your hand six inches above your orchid on a bright day, and a faint shadow indicates suitable conditions for low-light orchids, while a strong shadow suggests adequate light for high-light varieties.
East-facing windows provide ideal natural lighting for most orchid varieties, offering gentle morning sun followed by bright, indirect light throughout the day. West-facing windows can also work well, though you may need to filter intense afternoon sun with sheer curtains to prevent leaf burn.
For homes with insufficient natural light, grow lights offer an excellent solution for orchid growing. LED grow lights specifically designed for plants provide the full spectrum lighting orchids need while remaining energy-efficient. Position grow lights 12-18 inches above your orchids and provide 12-14 hours of illumination daily for optimal results.
Temperature and Humidity Control
Temperature control plays a crucial role in orchid care, with most varieties preferring daytime temperatures between 65-80°F (18-27°C). Many orchids benefit from nighttime temperature drops, which can encourage flowering in some species. This natural temperature fluctuation mimics their native environments and helps trigger blooming cycles.
Humidity levels between 40-70% create optimal conditions for orchid health. In dry indoor environments, increase humidity around your orchids using humidity trays filled with water and pebbles, placing plants near humidifiers, or grouping plants to create a microclimate with higher moisture levels.
Avoid placing orchids near heating vents, air conditioning units, or drafty windows, as rapid temperature fluctuations stress plants and can prevent blooming. Consistent temperatures within the preferred range promote steady growth and regular orchid blooms.
Watering Techniques and Schedules
The Art of Proper Watering
Watering orchids correctly represents perhaps the most critical skill in orchid care, as more orchids die from overwatering than underwatering. Most orchids prefer to dry out between waterings, and when watering, you should drench the pot thoroughly and drain completely, never allowing the plant to sit in standing water. This approach mimics natural rainfall patterns in their native habitats.
The general rule suggests watering most orchids once weekly, though this frequency depends on various factors, including pot size, potting medium, humidity levels, and seasonal changes. Sphagnum moss retains moisture longer than bark mix, requiring less frequent watering, while smaller pots dry out more quickly than larger containers.
Use tepid water for orchid irrigation, and water early in the day so foliage dries by nightfall. This timing prevents bacterial and fungal problems that thrive in consistently moist conditions. Always check the potting medium moisture level before watering by inserting your finger into the mix or lifting the pot to gauge its weight.
Recognizing Watering Mistakes
Overwatering symptoms include yellowing leaves, root rot, and a musty smell from the potting mix. Healthy orchid roots appear firm and white or green, while rotted roots become brown, mushy, and easily break when touched. If you discover root rot, immediately repot your orchid in fresh growing medium after removing all damaged roots.
Underwatering signs include wrinkled pseudobulbs (storage organs in some orchid types), silvery-gray roots that appear desiccated, and wilting or dropping leaves. While orchids tolerate slight drying better than excess moisture, chronic underwatering weakens plants and reduces blooming.
Monitor your orchids closely after watering to observe how quickly the potting medium dries. Adjust your watering schedule accordingly, as factors like seasonal changes, home heating, and air conditioning significantly impact moisture evaporation rates.
Choosing the Right Growing Medium
Understanding Orchid Potting Mixes
Orchid potting mix differs dramatically from standard potting soil, as orchids require excellent drainage and air circulation around their roots. Most commercial orchid mixes contain bark, perlite, and sometimes sphagnum moss, creating a chunky, well-draining medium that prevents root rot while providing stability for the plant.
Bark-based mixes work well for most orchid varieties, particularly Phalaenopsis and Cattleya orchids. These mixes typically contain fir bark, coconut husk chips, and perlite, creating spaces for air circulation while retaining appropriate moisture levels. As bark decomposes over time, it becomes more water-retentive and less breathable, necessitating regular repotting.
Sphagnum moss serves as an alternative growing medium for orchids, particularly in low-humidity environments where additional moisture retention benefits plant health. However, sphagnum moss requires more careful watering management, as it holds moisture longer than bark mixes and can lead to overwatering if not monitored carefully.
DIY Potting Mix Recipes
Creating your own orchid potting mix allows customization for specific varieties and growing conditions. A basic recipe combines 60% fir bark (medium grade), 20% perlite, and 20% coconut husk chips, providing excellent drainage with appropriate moisture retention for most orchid types.
For orchids requiring higher moisture retention, modify the mix to include 40% fir bark, 30% sphagnum moss, 20% perlite, and 10% coconut fiber. This combination works well for orchid varieties that prefer consistently moist (but not soggy) conditions.
Specialty ingredients like lava rock, diatomite, or cork bark can enhance drainage further for orchids requiring extremely fast-draining conditions. Always research your specific orchid variety’s preferences before creating custom potting mixes, as different species have varying moisture and drainage requirements.
Fertilizing Your Orchids

Understanding Orchid Nutrition
Orchid fertilizing requires a delicate balance, as these plants have evolved to extract minimal nutrients from their epiphytic lifestyle. Weekly feeding with fertilizer designed specifically for orchids provides essential nutrients without overwhelming the plant’s sensitive root system. Orchid fertilizers typically have lower concentrations than standard plant fertilizers, preventing nutrient burn while supporting healthy growth.
The “weakly weekly” approach works best for most orchids, meaning dilute fertilizer to quarter strength and apply weekly during the growing season. This consistent, gentle feeding mimics the slow nutrient availability orchids experience in nature, supporting steady growth without forcing excessive vegetative production at the expense of blooming.
Balanced fertilizers with equal nitrogen, phosphorus, and potassium ratios (such as 20-20-20) work well for most orchid care routines. However, some growers prefer higher nitrogen formulations during growing seasons and higher phosphorus blends before blooming periods to encourage flower development.
Seasonal Fertilizing Adjustments
During active growing seasons (spring and summer), maintain regular weekly fertilizing schedules to support new growth, root development, and flower spike formation. This period represents when orchids most readily utilize nutrients for photosynthesis and growth processes.
Reduce fertilizing frequency during fall and winter months when orchid growth naturally slows. Many growers switch to monthly feeding during these dormant periods, allowing plants to rest while preventing nutrient accumulation in the potting medium.
Monitor your orchids for signs of over-fertilization, including salt buildup on pot surfaces, brown root tips, or excessive leaf growth without flowering. If these symptoms appear, flush pots thoroughly with plain water and reduce fertilizer concentration or frequency in future applications.
Repotting and Root Care
When and How to Repot
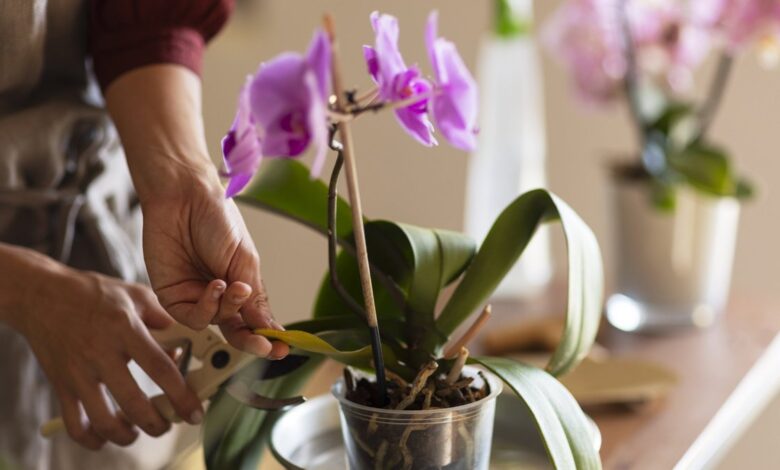
Repotting orchids typically becomes necessary every 1-3 years, depending on the potting medium breakdown and root growth. Signs indicating repotting needs include decomposing bark mix, roots growing extensively outside the pot, or potting medium that stays soggy after watering. The best time for repotting orchids occurs after blooming ends but before new growth begins, usually in late spring or early summer.
Carefully remove the orchid from its existing pot, gently shaking away old potting medium and examining the root system. Healthy roots appear firm and white or green, while damaged roots feel mushy or appear brown and papery. Use sterilized scissors to trim away all dead or rotted roots, leaving only healthy tissue.
Select a new pot only slightly larger than the root system, as orchids prefer to be somewhat pot-bound. Orchid pots should have multiple drainage holes to ensure excellent water drainage. After placing the plant in the new container, fill with fresh orchid potting mix, gently tapping to settle the medium without compacting it excessively.
Root System Maintenance
Orchid roots serve multiple functions beyond nutrient and water absorption. Many orchid varieties develop aerial roots that help anchor the plant and absorb moisture from humid air. These aerial roots are completely normal and should not be trimmed unless they become damaged or infected.
Healthy orchid root care involves minimal intervention beyond proper watering and ensuring adequate drainage. Avoid disturbing roots unnecessarily during routine care, as orchid roots can be quite fragile and slow to recover from damage.
If you notice declining plant health, examine the root system for problems. Root rot appears as brown, mushy roots that easily break when touched, indicating overwatering or poor drainage. Address root problems immediately by removing affected tissue and repotting in fresh growing medium with improved drainage.
Encouraging Orchid Blooms

Creating Optimal Blooming Conditions
Achieving spectacular orchid blooms requires understanding each variety’s specific blooming triggers and seasonal requirements. Most orchids need a period of environmental stress or change to initiate flower spike development. Temperature fluctuations, with cooler nights during fall, help encourage flowering in many orchid species.
Light intensity plays a crucial role in bloom initiation, as insufficient lighting prevents orchids from storing enough energy for flower production. Ensure your orchids receive adequate bright indirect light year-round, supplementing with grow lights if necessary during shorter winter days.
Proper nutrition timing also influences blooming success. Switch to phosphorus-rich fertilizers during fall months to support flower development, while maintaining consistent but reduced feeding schedules during potential blooming periods.
Post-Bloom Caring for Orchids Tips
After orchid flowers fade and drop, resist the temptation to immediately cut flower spikes. Some orchid varieties, particularly Phalaenopsis, may produce secondary blooms from existing spikes. Wait until spikes turn brown and dry before removal, cutting just above a node if you want to encourage potential secondary flowering.
Reblooming orchids require patience and consistent care throughout the year. Maintain proper watering schedules, adequate lighting, and appropriate temperatures even when plants aren’t flowering. This consistent care ensures orchids remain healthy and build energy reserves for future blooming cycles.
Some orchid varieties require specific rest periods with reduced watering and cooler temperatures to trigger reblooming. Research your particular orchid types to understand their individual blooming requirements and seasonal care adjustments.
Common Problems and Solutions
Identifying Plant Stress and Diseases
Orchid problems often manifest through changes in leaf color, texture, or growth patterns. Yellow leaves may indicate natural aging, overwatering, or insufficient light, depending on the pattern and progression. Lower leaves naturally yellow and drop as orchids mature, but widespread yellowing suggests care issues requiring attention.
Fungal infections appear as black or brown spots on leaves, often with yellow halos around affected areas. These problems typically result from excessive moisture on leaves combined with poor air circulation. Improve ventilation around your orchids and avoid getting water on leaves during irrigation to prevent fungal issues.
Pest problems in orchid care commonly include scale insects, mealybugs, and spider mites. Regular inspection of leaves, stems, and root areas helps detect pest infestations early when treatment is most effective. Isolate affected plants immediately to prevent pest spread to other orchids in your collection.
Preventive Care Strategies
Preventive orchid care focuses on maintaining optimal growing conditions that support plant health and resistance to problems. Ensure adequate air circulation around orchids by spacing plants appropriately and using fans if necessary to prevent stagnant air conditions that encourage fungal growth.
Quarantine new orchids for several weeks before introducing them to existing plant collections. This isolation period allows observation for hidden pest or disease issues while protecting established plants from potential problems.
Regular cleaning and maintenance of orchid growing areas, including pots, saucers, and tools, prevents the buildup of bacteria and fungi that can cause plant health problems. Use diluted hydrogen peroxide or isopropyl alcohol to sanitize equipment between plants.
Advanced Orchid Care Tips
Seasonal Care Adjustments
Seasonal orchid care modifications help plants transition naturally through annual cycles while maintaining optimal health. During spring and summer growing seasons, increase watering frequency slightly as higher temperatures and longer days accelerate plant metabolism and water usage.
Fall care transitions should include a gradual reduction in feeding frequency and slight decreases in watering as plant growth slows. Many orchids benefit from cooler nighttime temperatures during fall to trigger blooming mechanisms for winter or spring flowering.
Winter orchid care requires attention to heating effects and reduced light levels. Monitor humidity more closely as home heating systems create drier air conditions. Consider supplemental lighting during short winter days to maintain adequate illumination for orchid health.
Building an Orchid Collection
Expanding your orchid collection successfully requires understanding the specific needs of different varieties and ensuring you can provide appropriate care for each type. Start with proven beginner varieties like Phalaenopsis orchids before attempting more challenging species that require specialized conditions.
Consider growing space limitations when adding new orchids to your collection. Each plant needs adequate space for air circulation and access to appropriate lighting. Plan your growing area to accommodate mature plant sizes and any special equipment like humidity trays or grow lights.
Document your orchid care routines for each variety, including watering schedules, fertilizing dates, and repotting history. This record-keeping helps track what works best for individual plants and identifies patterns in blooming cycles or care requirements.
More Read: A Beginner &# Guide for Growing and Caring for Ginger Plants
Conclusion
Mastering orchid care transforms from an intimidating challenge into a rewarding hobby when you understand these magnificent plants’ fundamental needs. Success with orchids stems from consistent attention to proper watering techniques, appropriate lighting conditions, suitable potting medium, and regular fertilizing schedules rather than complex interventions.
By mimicking their natural epiphytic environment through well-draining growing medium, bright indirect light, and careful moisture management, your orchids will reward you with spectacular blooms that last for months. Remember that orchid growing requires patience and observation, as these plants operate on their own timeline for growth and flowering.
With proper preventive care, seasonal adjustments, and understanding of each variety’s specific requirements, you’ll develop the skills to maintain healthy orchids that provide years of beautiful flowers and growing satisfaction. Whether you’re nurturing a single Phalaenopsis orchid or building an extensive collection, these proven Caring for Orchids Tips will guide you toward success with these extraordinary flowering houseplants.